
React Native Firebase Integration (with Push Notifications)
Firebase is a powerful Backend-as-a-Service (BaaS) that supports features like authentication, databases, cloud functions, storage, and push notifications
This document will help you:
- Create your first React Native app (React Native CLI)
- Install and configure Firebase
- Set up push notifications (FCM) for Android and iOS
Prerequisites
Before you start, make sure you have:
- Node.js (https://nodejs.org/)
- React Native CLI (no need to install globally; we use npx)
- Android Studio (for Android development)
- Xcode (for iOS development, Mac only)
- A Firebase account (console.firebase.google.com)
- A code editor (e.g., VS Code)
1. Create Your First React Native App
Open your terminal and run:
npx @react-native-community/cli init MyFirebaseApp --template react-native-template-javascript

cd MyFirebaseApp
- npx runs the React Native CLI without installing it globally.
- @react-native-community/cli init MyFirebaseApp creates a new project.
- cd MyFirebaseApp moves you into your project directory.
2. Install Firebase Modules
Install the Firebase libraries your app will use:
bash
npm install @react-native-firebase/app @react-native-firebase/auth @react-native-firebase/firestore @react-native-firebase/messaging- @react-native-firebase/app: Core Firebase integration
- @react-native-firebase/auth: Authentication (login/signup)
- @react-native-firebase/firestore: Firestore database
- @react-native-firebase/messaging: Push notifications (FCM)
3. Create and Configure a Firebase Project
A. Create a Firebase Project
- Go to the Firebase Console.
- Click Add project and follow the prompts.
- Once created, you’ll be taken to your project dashboard.
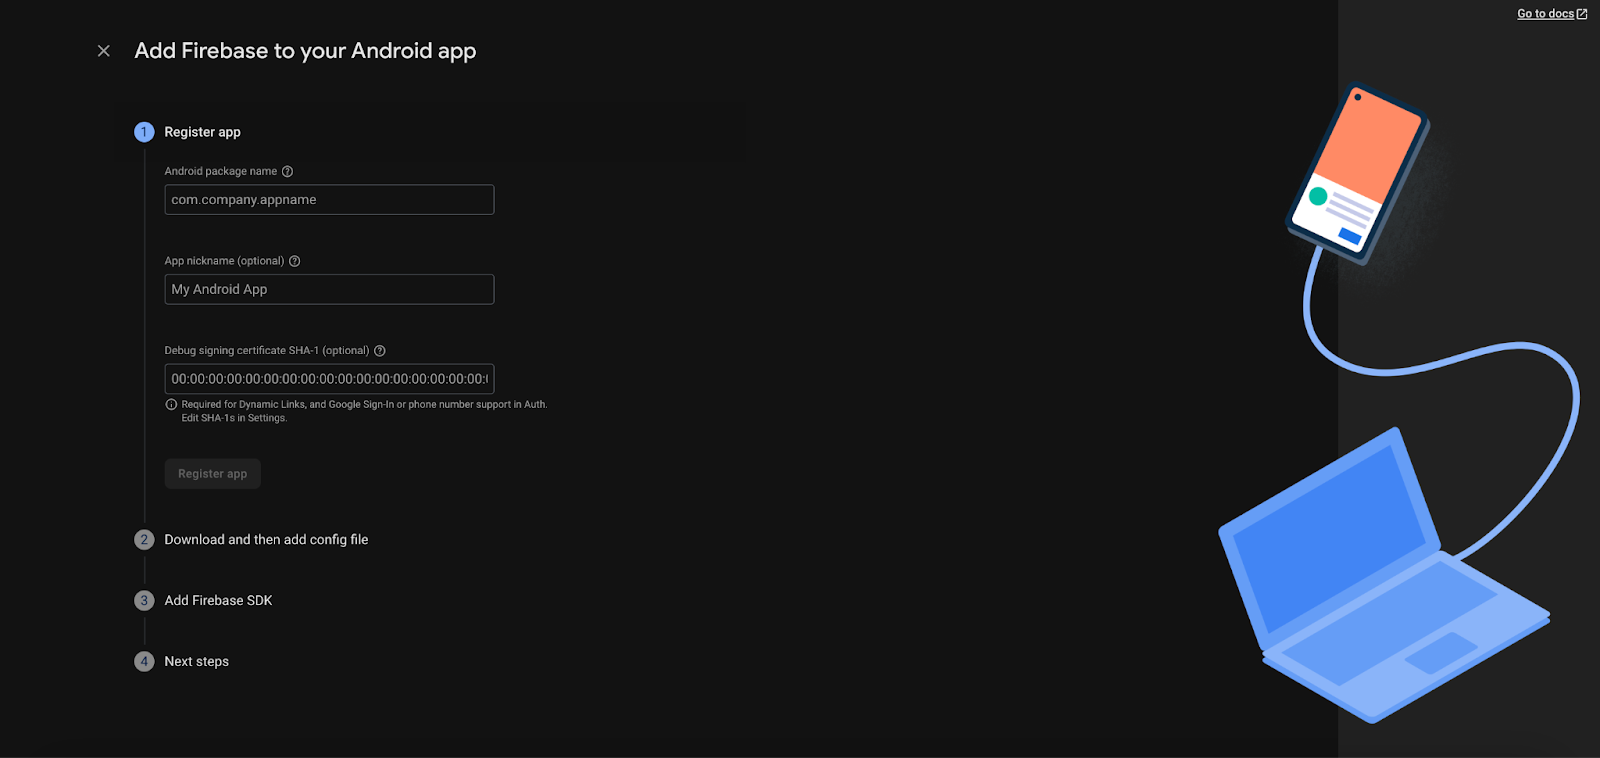
B. Register Your Android App
- In Firebase Console, click the Android icon to add an Android app.
- Enter your Android package name (find it in android/app/build.gradle).
- Download the google-services.json file.
- Move google-services.json into your React Native project at android/app/.
Update Android Gradle Files
- In android/build.gradle, add the Google Services classpath inside buildscript > dependencies:
- groovy
classpath ‘com.google.gms:google-services:4.3.15’ // or latest
- In android/app/build.gradle, add at the bottom:
- groovy
apply plugin: 'com.google.gms.google-services'C. Register Your iOS App
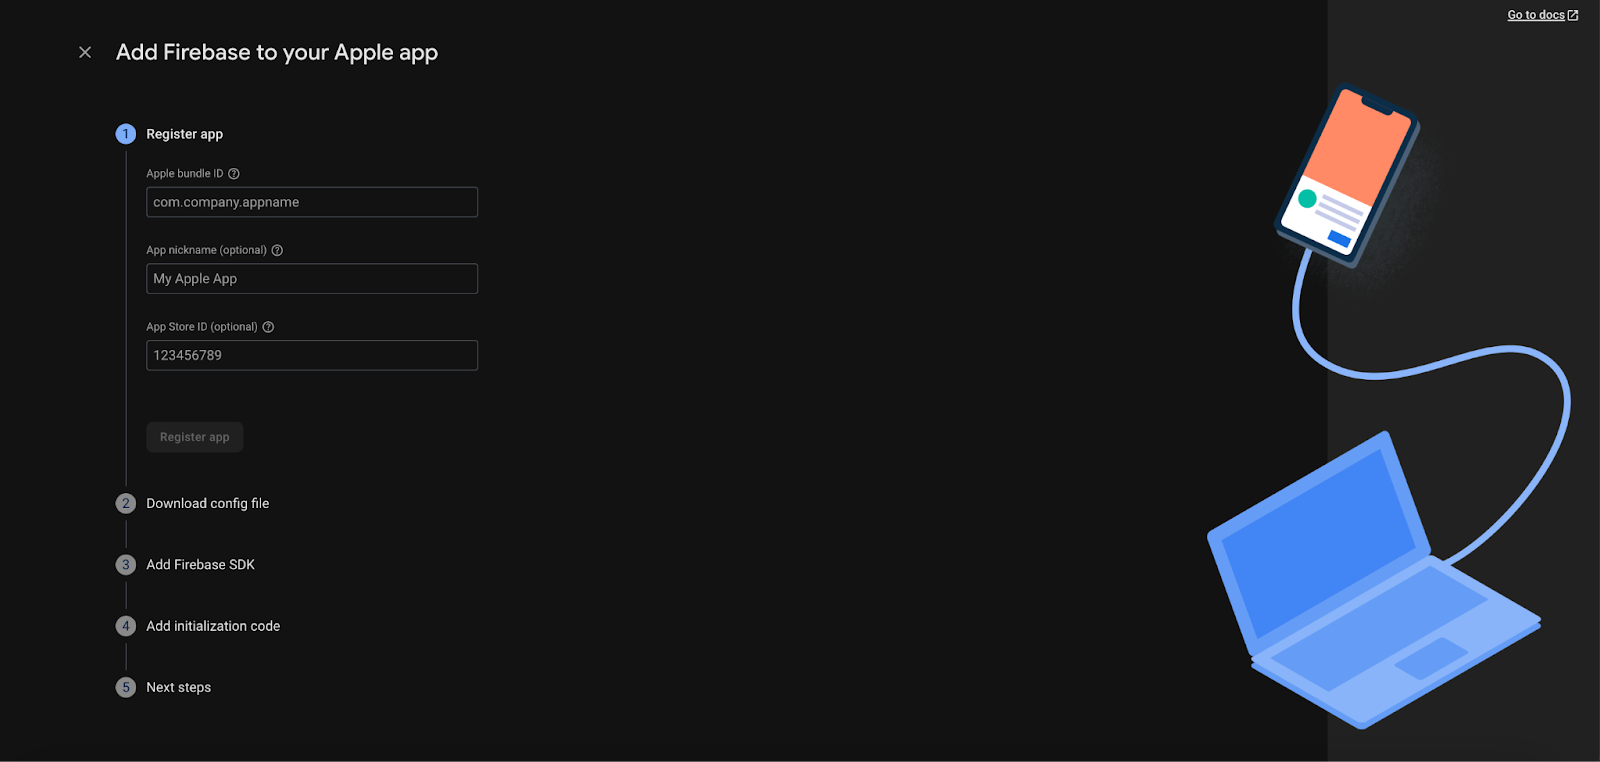
- In Firebase Console, click the iOS icon to add an iOS app.
- Enter your iOS bundle ID (find it in Xcode under your project settings).
- Download the GoogleService-Info.plist file.
- In Xcode, drag and drop GoogleService-Info.plist into your project root (make sure “Copy items if needed” is checked).
Install CocoaPods
| cd ios pod install cd .. |
Enable Capabilities in Xcode
- Go to Signing & Capabilities in Xcode.
- Add Push Notifications.
- Add Background Modes and check Remote notifications.
4. Set Up Push Notifications (FCM)
A. Android Permissions
Add these lines to android/app/src/main/AndroidManifest.xml (usually near the top):
xml
<uses-permission android:name="android.permission.INTERNET" />
<uses-permission android:name="android.permission.RECEIVE_BOOT_COMPLETED"/>
B. iOS Permissions
- Ensure you enabled Push Notifications and Background Modes > Remote notifications in Xcode.
C. Request Permissions and Handle Notifications in Code
Add the following to your main component (e.g., App.js):
import React, { useEffect } from 'react';
import { View, Text, Alert } from 'react-native';
import messaging from '@react-native-firebase/messaging';

const App = () => {
  useEffect(() => {
    // Request notification permissions on iOS
    const requestPermission = async () => {
      const authStatus = await messaging().requestPermission();
      const enabled =
        authStatus === messaging.AuthorizationStatus.AUTHORIZED ||
        authStatus === messaging.AuthorizationStatus.PROVISIONAL;

      if (enabled) {
        console.log('Authorization status:', authStatus);
      }
    };

    requestPermission();

    // Handle notifications when app is in foreground
    const unsubscribe = messaging().onMessage(async remoteMessage => {
      Alert.alert('New Notification!', remoteMessage.notification?.title);
    });

    // Handle notifications in background/quit state
    messaging().setBackgroundMessageHandler(async remoteMessage => {
      console.log('Message handled in the background!', remoteMessage);
    });

    return unsubscribe;
  }, []);

  return (
    <View>
      <Text>Firebase Push Notifications Ready!</Text>
    </View>
  );
};

export default App;
5. Run Your App
Start Metro Bundler
npx react-native start- This starts the JavaScript bundler for your app.
In a new terminal, run on Android:
bash
npx react-native run-android
- Builds and launches your app on an Android device or emulator.
Or, run on iOS (Mac only):
bash
npx react-native run-ios
- Builds and launches your app on the iOS simulator.
6. (Optional) Add More Firebase Modules
Install more Firebase services as needed:
bash
npm install @react-native-firebase/firestore @react-native-firebase/storageExample usage:
javascript
import firestore from '@react-native-firebase/firestore';
import storage from '@react-native-firebase/storage';
Conclusion
You have now:
- Created a React Native app using React Native CLI
- Installed and configured Firebase for both Android and iOS
- Set up push notifications (FCM)
- Learned how to run your app and expand with more Firebase features
For more Firebase features, check the official React Native Firebase documentation.

Rishabh Mishra
Software Developer


